



 +94 (0) 31 228 1114
  info@cocopeatcoirmulch.com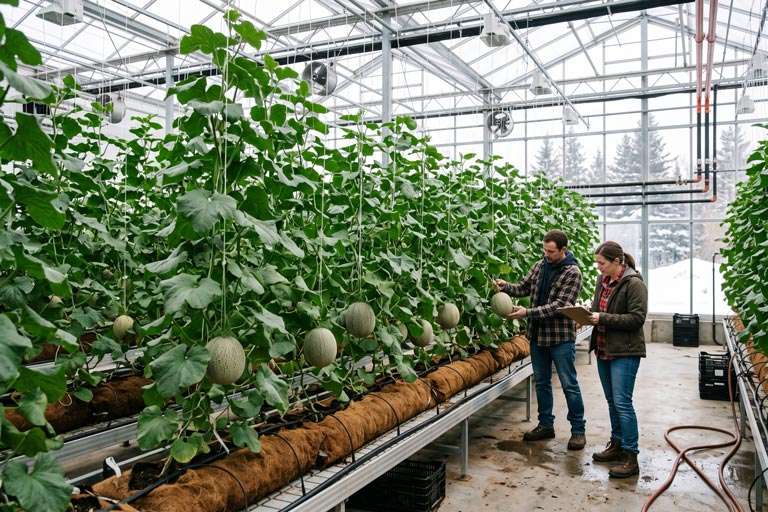

Greenhouse Melon Production in Coco Coir: 8 Steps
Greenhouse Melon Production in Coco Coir: 8 Steps to Sweeter, Heavier Fruit
Greenhouse melon production is a bit like raising a thoroughbred. The plant grows fast, drinks hard, eats well and gets moody when you change its routine. Get it right and you’re rewarded with heavy, fragrant fruit that sells at a premium. Get it wrong and you’ll see cracked skins, flat flavour and a very long face at the packing shed. This guide shows how growers use coco coir to keep melons steady from planting to the last pick, in eight clear steps.
Whether you grow in Ontario, Mexico, the Netherlands, Korea or the Gulf, the plant is the same. Only the weather changes.
Why do melons and coir get along so well?
Melons are greedy. A single vine can carry two or three heavy fruits on a long stem, and every one of them has to be filled with water and sugar. That puts a huge demand on the roots. The roots need plenty of water, but they also need air, and a soggy, packed medium shuts that door fast.
Coir sits in a sweet spot. It holds a lot of water, it drains freely, and its fibre keeps small air pockets open around the roots. Because it’s a clean, soilless medium, it also lowers the risk of the soil-borne diseases that haunt melon fields. And it’s a steady performer from one season to the next when it’s washed and graded well.
Sri Lanka is one of the world’s major coir suppliers, and the country’s export promotion portal for coconut products lists coir products among its coconut exports. If you’re sourcing for a large block of melons, that kind of experience with washing, grading and shipping matters. Consistency is half the battle.
Pick the right melon for your market
Before you order a single bag, decide what you’re growing. Galia and cantaloupe melons are the usual choice for European and Middle Eastern buyers; they carry a strong scent and a good shelf life. Charentais types are popular where buyers want an intense flavour. Honeydew types do well in North America. In Korea and Japan, the market leans toward oriental melons and netted types with a very high sugar level and a premium price.
Each type has its own appetite. A thick-skinned Galia can handle a bit more stress than a delicate netted melon, which bruises, cracks and complains at the smallest swing in water. Talk to your seed supplier about the crop load and the feed strength they recommend.
Greenhouse melon production in coir: the plan at a glance
Here’s the overview. You plant young seedlings into pre-wetted coir, train them up a high wire, feed them gently, and move to stronger potassium as the fruit swells. Then you ease the water slightly near ripening to push sugar up. Simple on paper. The details are where the quality lives.
Dates vary by variety and season, but many crops run roughly 80 to 110 days from planting to the first harvest. So every week matters.
Step 1: Choose the right bag size
Melons need more root room than a pepper or a cucumber of the same height. Coir bag size for melons usually works out at roughly 15 to 20 litres of medium per plant as a sound starting point. A one-metre slab holding two plants is common, but a deeper open top planter bag gives bigger volume and a larger water reserve for those long, bright summer afternoons.
Step 2: Hydrate, rinse and settle the bags
Soak the bags fully before planting. Let the water move all the way through, then check the drain EC. If it reads well above your feed water, rinse again until it settles. Young melon roots don’t enjoy a salty start.
Give the bags a day or two to settle before planting. It’s tempting to rush, especially when the plants are waiting in the nursery, but patience here pays back in even stands.
Step 3: Set your starting EC and pH
Melon EC and pH in coir need a gentle start. Many growers run a feed EC of about 2.0 to 2.5 dS/m in the early weeks and lift it a notch as fruit swells, with a root zone pH around 5.8 to 6.2. These aren’t magic figures; they’re a starting point to adjust against your variety, climate and water source.
Check the drain every day. If drain EC runs more than about 1 dS/m above the feed, ease it back with a bit more water. If it falls well below the feed, the plants may need stronger nutrients.
Step 4: Train the vines high
High-wire melon training makes the best use of the space. A common plan is around 2 to 2.5 plants per square metre, with a single main stem tied to a wire and side shoots removed on the lower part. Fruit-bearing laterals higher up carry the crop.
Prune with clean tools and cut on dry mornings, so wounds heal quickly. Think of it as tidying a bookshelf: the aim is light, air and easy access, not a bare stick.
Step 5: Irrigate in small, steady pulses
Cracked fruit is almost always a story about water swings. A dry spell followed by a big drink makes the fruit swell too fast, and the skin splits. Coir helps because it holds a steady moisture level, but only if you feed it little and often.
Use many short pulses through the bright hours rather than a few long ones, and aim for a drain of roughly 20 to 30 percent in strong light. As the crop grows and the weather warms, increase pulse frequency, not just pulse length. Keep the schedule smooth and avoid big jumps.
Step 6: Help pollination and fruit set
Melons need pollen to move from male to female flowers. Many greenhouses use bumblebees; others rely on hand pollination, which is slow but precise. Mark the pollination dates with tags so you know when each fruit started.
Then thin. Large Galia and honeydew types often do best with one or two fruits per plant, while smaller types may carry more. It feels wrong to remove baby melons, doesn’t it? But a plant carrying too many puts out many small, bland fruit instead of a few great ones.
Step 7: Feed for sweetness
Melon fruit set and Brix are tied to your feeding plan. Before fruit set, too much nitrogen pushes leaf growth and weak flowers. After fruit set, ease the nitrogen, raise potassium, and keep calcium steady to protect the skin. Many growers aim for a Brix of about 11 to 14 at harvest, depending on variety and market.
Near ripening, slightly less water helps concentrate sugars. But take it slowly. A sudden drought will crack the fruit and stress the vine, which undoes your good work.
Step 8: Protect the roots
Melon root rot prevention starts with clean habits. Fusarium wilt and Pythium can both strike melons, and Monosporascus is a known trouble in hot soils. Growing in coir already lowers the risk compared with soil, but it doesn’t remove it.
Use clean water, keep the root zone warm but not hot (roughly 20 to 25 degrees Celsius suits most melons), and sanitise tools and trays between crops. Remove sick plants early, and bag them before you move them. If you start with fresh Coco Peat Grow Bags for each cycle, you also skip the disease carry-over that comes with older media.
Climate matters: Ontario winters, Dubai summers
A melon doesn’t care about your postcode, but it cares a lot about light and heat. In Ontario or the Netherlands, winter crops need supplementary lighting and careful heating to keep roots warm. In Dubai or Mexico, the challenge flips: shade, ventilation and cooling pads protect the plants from stress, and the irrigation schedule has to keep up with the heat.
In Korea and Japan, humidity and rainy seasons add a disease angle. Good air movement and a tidy canopy help a lot. Whatever your climate, adjust the plan to the weather rather than the calendar.
Harvest time: when is a melon really ready?
Count days from pollination, and trust your nose as much as the calendar. Galia types change from green to a golden yellow and give off a sweet smell near the stem. Cantaloupe types often slip from the vine with a gentle twist. Netted melons show a fully formed net and a dry tendril near the fruit.
Pick in the cool part of the morning when you can. Handle each fruit like an egg, and keep them out of direct sun. A great melon can lose its edge in an hour on a hot trolley, and that would be a shame after months of careful work.
Take a few Brix readings from each house every week with a hand refractometer. Write the numbers down next to the feed EC and the irrigation settings. In two or three crops you’ll have your own rule book, and it’ll beat any guide on the internet.
What growers say about melons in coir
I used this eight-step outline as a one-page crop guide when a client moved a Galia house from soil to coir. The team liked having a clear order for the first week, and the checks on drain EC caught a feed mistake early.
Our customers are really happy with the water-holding steadiness of our coir, and a melon grower in the Middle East told us: “Fruit cracking dropped once we moved to short, frequent pulses, and the bags stayed evenly wet even in the hottest weeks.” That’s the kind of feedback that tells you the system is working.
So, is coir worth trying for your melons?
If you’ve fought cracked skins, patchy sugar or soil disease, yes, it’s worth a trial. Start with one house or one row. Keep notes on bag size, EC, pulse timing and Brix at harvest. Compare it against your current method.
Melons reward growers who pay attention. Coir gives you a steady base, and the rest is routine, observation and a bit of patience. Which, as any melon grower will tell you, is half the fun.
Frequently Asked Questions
What is the best growing medium for greenhouse melons?
Many commercial growers use washed, low-EC coco coir in slabs or grow bags. It holds water well, drains freely and keeps air around the roots, which melons need for steady growth and good fruit quality.
What EC and pH should melons have in coco coir?
A common starting point is a feed EC of about 2.0 to 2.5 dS/m, rising slightly as the fruit swells, with a root zone pH of 5.8 to 6.2. Adjust for your variety, water source and climate.
How many melon plants can I grow in one coir bag?
A one-metre slab commonly holds two plants, while larger planter bags give more root volume per plant. A rough guide is 15 to 20 litres of medium per plant.
How do I stop greenhouse melons from cracking?
Avoid big swings in water supply. Use short, frequent irrigation pulses, keep drain levels steady, and ease water slowly near ripening instead of cutting it off suddenly.
How can I raise the sugar level of my melons?
Ease nitrogen after fruit set, raise potassium, keep the canopy healthy, and slightly reduce water near ripening. Thin the fruit load so each melon gets enough sugar, and harvest at the right maturity.
